In today's digital landscape, capturing and maintaining audience attention is crucial for content creators. Viewer retention—the measure of how long viewers engage with video content—plays a pivotal role in determining a video's success. High retention rates not only reflect audience satisfaction but also influence platform algorithms, boosting content visibility. One effective strategy to enhance viewer retention is the use of captions. Tools like CapCut's desktop video editor, a leading video editor for PC, offer AI-powered caption generators that simplify this process. By integrating accurate and customizable captions, you can make your videos more engaging and accessible, thereby improving viewer retention.
Why Viewer Retention Matters
Understanding audience engagement metrics is essential for any content creator. Viewer retention indicates how much of your video content viewers watch before clicking away. Platforms like YouTube and TikTok prioritize videos with higher retention rates, as these metrics suggest valuable and engaging content. This prioritization can lead to increased recommendations and broader audience reach. Moreover, in an era where attention spans are dwindling, capturing and holding viewer attention has become more challenging. Visual aids like captions can play a significant role in keeping viewers engaged, as they provide an additional layer of information processing that caters to both auditory and visual learners.
The Role of Captions in Keeping Viewers Engaged
Captions serve as a powerful tool to retain the audience's attention. They cater to diverse audiences, including those who are deaf, non-native speakers, or individuals watching videos in noise-sensitive environments where audio isn't feasible. By providing textual representation of spoken words, captions ensure that the content is accessible to a broader audience. CapCut's desktop video editor enhances this accessibility with its auto-captioning feature, which accurately transcribes speech into text, supporting multiple languages and dialects. This inclusivity not only broadens your audience base but also fosters a more engaging viewing experience.
How Captions Improve Video Comprehension
Captions do more than just display text; they enhance comprehension and information retention. By breaking language barriers through auto-generated multilingual captions, viewers from different linguistic backgrounds can understand and enjoy your content. Additionally, readable text overlays reinforce spoken information, aiding in memory retention. In scenarios where viewers consume content without sound—such as in public places or during multitasking—captions ensure that the message is still conveyed effectively. This adaptability aligns with current consumption trends, where silent viewing is everyday.
How to Generate Captions with Python
While there are hundreds of plug-and-play tools available to generate captions automatically, where is the fun in that? Another important reason to use Python to generate captions is that whenever anything goes wrong, you know how to fix it, instead of depending on the tool’s support team to fix it for you. Let’s get our hands dirty with some Python scripts!
Get! Set! Learn!
Step1: Set Up Your Environment
First, let us get started by installing the required libraries. If you are a beginner, we recommend learning the syntax to use Pip to install multiple packages at once here. Here is the command to execute for installing all the required libraries:
pip install tensorflow keras numpy nltk matplotlib pillow
Here is why each of these libraries are required:
- TensorFlow/Keras: For building deep learning models.
- NumPy: For numerical operations.
- NLTK: For text preprocessing.
- Pillow: For image handling.
Step 2: Collect a Dataset
Now that we have libraries installed, let us use datasets. Always prefer those that provide images paired with captions like MSCOCO or Flickr8k/30k.
Step 3: Preprocess Images
Extract features from images using a pre-trained CNN (Convolutional Neural Network) like VGG16 or InceptionV3.
Let us look at a sample Python script.
from tensorflow.keras.applications.inception_v3 import InceptionV3, preprocess_input
from tensorflow.keras.preprocessing.image import load_img, img_to_array
from tensorflow.keras.models import Model
import numpy as np
# This step is to load InceptionV3 model that is pre-trained on ImageNet
base_model = InceptionV3(weights='imagenet')
model = Model(inputs=base_model.input, outputs=base_model.layers[-2].output)
# This section preprocess an image
def extract_features(image_path):
img = load_img(image_path, target_size=(299, 299))
img = img_to_array(img)
img = np.expand_dims(img, axis=0)
img = preprocess_input(img)
features = model.predict(img)
return features
Step 4: Preprocess Captions
Now we have raw captions. Next step is to clean and tokenize the captions: Here is how you can clean and tokenize the captions:
import string
from nltk.tokenize import word_tokenize
from keras.preprocessing.text import Tokenizer
# This section of the script loads captions
def clean_caption(caption):
caption = caption.lower().translate(str.maketrans('', '', string.punctuation))
tokens = word_tokenize(caption)
return ' '.join(tokens)
# This section tokenizes captions
def tokenize_captions(captions):
tokenizer = Tokenizer()
tokenizer.fit_on_texts(captions)
return tokenizer
Step 5: Create a Model
By “creating a model”, do not be overwhelmed. It is a fairly simple procedure in Python. Now, let us build an encoder-decoder model:
- The encoder processes image features using a pre-trained CNN.
- The decoder uses an LSTM or Transformer to generate captions.
Here is an architecture of a sample model:
from tensorflow.keras.models import Model
from tensorflow.keras.layers import Input, Dense, LSTM, Embedding, Dropout, add
# First let us define the model
def create_model(vocab_size, max_length):
# Image feature input
image_input = Input(shape=(2048,))
image_dense = Dense(256, activation='relu')(image_input)
# Next let us caption the input
caption_input = Input(shape=(max_length,))
caption_embedding = Embedding(vocab_size, 256, mask_zero=True)(caption_input)
caption_lstm = LSTM(256)(caption_embedding)
# Finally, let us combine the image and caption
combined = add([image_dense, caption_lstm])
output = Dense(vocab_size, activation='softmax')(combined)
model = Model(inputs=[image_input, caption_input], outputs=output)
return model
Step 6: Train the Model
The model is as smart as the training we provide it. Compile and train the model using the dataset. Use teacher forcing during training to improve sequence generation. Here is an example for you to get started:
model.compile(optimizer='adam', loss='categorical_crossentropy')
model.fit([images, captions_input], captions_output, epochs=20, batch_size=64)
Step 7: Generate Captions
Once we have trained the model, use it to predict captions for new images:
def generate_caption(model, tokenizer, image_features, max_length):
caption = 'startseq'
for i in range(max_length):
sequence = tokenizer.texts_to_sequences()[0]
sequence = pad_sequences([sequence], maxlen=max_length)
yhat = model.predict([image_features, sequence], verbose=0)
word = tokenizer.index_word[np.argmax(yhat)]
if word == 'endseq':
break
caption += ' ' + word
return caption
Step 8: Fix bugs and Improve
Do not be disappointed if the model doesn’t generate captions like you wanted. Keep experimenting with hyperparameters, model architecture, and datasets. Use Beam Search instead of greedy search for better captions. Consider transformers like GPT or BERT for the decoder.
Using CapCut Desktop Video Editor for Maximum Retention
CapCut Desktop video editor's AI-powered caption generator automates the captioning process, making it seamless and efficient. Features like bilingual captions allow you to translate your captions into over 15 languages with just one click, making your content accessible to a global audience. The filler word removal feature enhances clarity by eliminating unnecessary words, resulting in more concise and engaging captions. Moreover, CapCut desktop offers customization options, enabling you to adjust color, font, and animation effects to align with your video's aesthetic, thereby enhancing viewer engagement.
How to Generate Captions? - Step by Step
Step 1: Install CapCut Desktop and Import Your Media
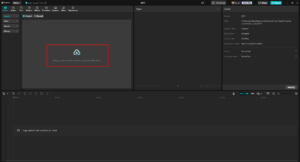
Begin by downloading CapCut's "Video Editor for Desktop" from the official website. After installation, log in and create a new project. Click "Import" to upload your video or audio file from your computer. CapCut desktop also provides access to a free audio and video stock library, offering a variety of resources to enhance your project.
Step 2: Use AI to Generate Captions
Drag your media file onto the timeline. Navigate to the "Text" menu and select "Auto Captions." CapCut's AI will automatically detect the language used in your video and generate captions that synchronize with the playback. This feature supports multiple languages, allowing you to reach a global audience. Additionally, you can enable dual-language captions or utilize the filler word removal feature to enhance clarity.
Step 3: Edit and Customize Captions
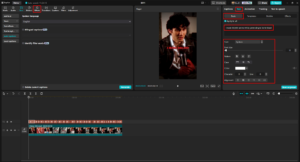
Click on the captions in the timeline to open the editing panel. Here, you can modify the text, change fonts, resize captions, and adjust colors to match your video's style. CapCut Desktop video editor's AI translation tool allows you to generate captions in another language, further expanding your content's reach. You can also add animations, transitions, or effects to enhance readability and engagement. Moreover, CapCut offers a free AI video generator that enables you to create videos from text inputs or convert images into videos, providing additional creative possibilities.
Step 4: Export and Publish
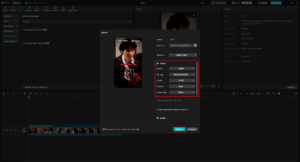
Once you're satisfied with your video, click "Export." Set your desired resolution, frame rate, and format (such as MP4 or WAV). Before sharing your content on platforms like YouTube or TikTok, ensure that you have the necessary rights and permissions for any included materials to avoid copyright issues. After verifying compliance, proceed to share your engaging and accessible video with your audience.
Conclusion
Captions significantly enhance viewer retention by making content more accessible and engaging. Incorporating a caption generator into your video editing process is no longer optional but a necessity in today's diverse and fast-paced digital environment. CapCut's desktop video editor stands out as an ideal choice for content creators, offering AI-powered captioning features that are both accurate and customizable. By leveraging these tools, you can create videos that not only capture attention but also retain it, leading to tremendous success across various platforms.


